FAQ: Setting Up Digital Signatures and Domain Reputation
If you plan to send bulk email campaigns, ensure the sender’s and domain's reputation so that mail servers or recipients accept the messages instead of sending them to spam. Here, we will look at the most frequently asked questions regarding the factors affecting the reputation of an email domain.
Is It Necessary to Send Emails from Corporate Email Addresses?
Mailings from a corporate address are a mandatory requirement for most mailing services, including Yespo.
- **Example of a corporate sender address:
shop@brand-name.com

- **Example of a public sender address:
shop@gmail.com
The mandatory use of corporate mail is due to several factors:
- Mailings sent from public addresses (especially in large quantities) fall into the spam filters of most mail services.
- Getting into spam filters worsens the sender's reputation, as a result of which mail servers refuse to accept its mailings.
- Due to restrictions on the number of sendings from public addresses, bulk mailings may lead to temporary account blocking by most email services.
- Laws governing email marketing (for example, GDPR in the European Union) require that recipients of emails be aware of the senders: mailings from personal or public email addresses violate them.
Benefits of using a corporate address:
- Increasing the mailing trust: recipients understand which company they received the email from and are likelier to open it.
- Consistent communication: branded emails promote consistency in marketing campaigns, improve brand awareness, and build trust with the target audience.
- The ability to verify a domain and thereby protect your campaigns from fakes and your subscribers from scammers. In addition, since 2018, domain verification has been a mandatory requirement for marketing mailings, and as of 02.01.2024, some additional requirements for Gmail came into force, which you can find here.
- Formation of sender reputation: mail servers analyze the history of subscribers’ interactions with company emails and contribute to high delivery rates, mark emails as important, etc.
Why Do I Need DNS Settings?
DNS (Domain Name System) settings enable entry of the following records:
- MX (Mail eXchanger),
- SPF (Sender Policy Framework),
- DKIM (DomainKeys Identified Mail)
- DMARC (Domain-based Message Authentication, Reporting, and Conformance).
These technologies allow email services to verify email authenticity and determine whether they are legitimate, which helps in maintaining the sender's reputation and preventing emails from being classified as spam.
The minimum action you need to take after purchasing a domain:
- place a record about this domain on Name servers (DNS),
- set up mail reception for this domain.
Typically, the provider from whom you purchase your domain and hosting does all these basic settings automatically. Otherwise, contact your hosting provider's support team or your technician for assistance.
By default, all user responses are sent to the same address used for sending. If you want to send messages from a common address, for example, news@yourcompany.com, and responses — to another address, add a reply address in the Yespo email editor.
If you have had a domain for a long time and have even used it for email campaigns through other services, to work with our service successfully, you will have to change some settings in the DNS, which are described below.
How to Add Records to DNS?
To add or edit records in the domain DNS, you or your technical specialist need to read the instructions for using the DNS editor of your hosting provider or contact their support service (you can also read our instructions for domain verification in the Cloudflare).
DNS can store different record types. We will consider only those necessary for properly setting up mail and mailings.
MX Record
MX is the primary record for the mail domain. A domain that does not have such a record is not considered an email domain. MX record identifies one or more servers that accept mail for a given domain.
There may be several such records. In addition to the server, the MX record indicates its priority — a number from 0 and higher. The lower the number, the higher priority the server is considered. Emails from your domain will be sent first to the server with the highest priority and, if this server is unavailable, to the next highest priority.
Record example:
esputnik.com. IN MX 1 aspmx.l.google.com.
esputnik.com. IN MX 5 alt1.aspmx.l.google.com.
You already have MX records if mail is configured correctly on your domain. There is no need to change or add anything.
SPF Record
The SPF record lists the IP addresses of servers that a domain owner allows to send mail on behalf of their domain. This is a security mechanism to protect mailings from spoofing by spammers.
If an email passes the SPF check, the rating restrictions of a specific mail system are imposed on it as for a verified domain. If an email does not pass the SPF check, the rating restrictions of a specific mail system are imposed on the email as for a suspicious domain; the message can either be accepted as spam or rejected, depending on the settings. Current ratings for emails that passed and failed verification can be combined when visualized for the user in different postmasters.
Note
Postmasters are services that some postal services have developed to provide detailed statistics and analytics on authentication standards such as SPF, DKIM, DMARC, and mailing metrics such as delivery statuses, unsubscribes, spam complaints, and more. The most popular postmasters are Google Postmaster Tools, Yahoo! Feedback Loop, Outlook.com Postmaster.
According to the current standard, the SPF record is entered into the DNS with the TXT type, must begin with v=spf1... and be unique for each mail domain.
There are other restrictions:
- each string must not be longer than 450 characters;
- the entire SPF record must be obtained from the DNS in no more than ten subqueries in the DNS;
- it must not contain duplicate links, recursions, and links to non-existent records;
- there must be no more than two empty subqueries in a record.
Typically, a hosting provider has guidelines for basic SPF record setup. Make these settings. Some hosting providers automatically add the correct SPF record to the DNS when setting up mail for your domain.
If you see something like this in your SPF record:
“v=spf1 redirect=_spf.google.com”
replace it with the option without using the “redirect=” construction (which links to another record): “v=spf1 include:_spf.google.com ~all”
Depending on the connection option for your domain on our service (Full/Full+/Subdomain), you must make some additions to your SPF record.
The minimum addition that we recommend when sending mailings through our service, even for the basic option, is to add the insert “include:spf2.esputnik.com” inside the already existing SPF string of your domain, which address you plan to use in the Sender field of your emails.
Record example:
esputnik.com. IN TXT "v=spf1 include:_spf.google.com include:spf2.esputnik.com ~all"
DKIM Technology
DKIM technology is an email authentication mechanism that helps verify that emails sent from a specific domain are legitimate and not spoofed.
DKIM is automatically checked by the server receiving the message. The result of signature verification forms the sender's and mailing reputation.
DKIM technology works using a pair of keys — public and private.
- The private electronic key is stored in the mail system to create a signature.
- The public key is published to everyone via DNS — any mail system that receives an email signed by this technology can verify the signature by obtaining the public key from DNS.
There can be an unlimited number of such key pairs. The sending server that signs the email indicates the identifier of the private key with which the signature was created in the header, along with the digital signature. The receiving server selects the required public key from the DNS for verification using this identifier.
Not all messages are signed, but only important fields in its header.
If the signature is correct, the email is subject to the rating restrictions of a specific mail system as for a verified domain. If the DKIM signature is not valid, the email is subject to the rating restrictions of the specific mail system as for a suspicious domain, the email can either be accepted as spam or rejected, depending on the settings. Current ratings for emails that passed and failed verification can be combined when visualized for the user in different postmasters.
Example of a public key record:

Important
We store a single public key for our customers and recommend that they describe it in their DNS as a link with a CNAME record type. This simplifies making records, reduces the number of errors in settings, and allows us to work more flexibly with the configuration, even replacing a pair of electronic keys at any time.
An example of a public key record when working with our service for the example.com domain:
esputnik._domainkey.example.com. IN CNAME dkim.esputnik.com.
DMARC Technology
DMARC technology identifies emails by SPF and DKIM and determines what to do if the mailing is sent from IPs or domains not specified in these signatures: none, quarantine or reject.
We recommend implementing a strict DMARC policy "v=DMARC1; p=reject; adkim=s; aspf=s; sp=reject; rua=mailto:postmaster@ yourdomain.com".
You should start with the email quarantine policy p=quarantine pct=5 and use the pct parameter to set the percentage of messages to which the DMARC rule is applied, gradually increasing the percentage to pct=100. Then, set a strict policy with the initial value of the percentage of rejected emails p=reject pct=5 and progressively increase the pct parameter's value to 100%. Provided you carry out regular mailings, you can increase the percentage (pct) of filtered emails every few days. The rua tag allows you to specify an address to receive reports about deploying DMARC rules in your domain. Enter your email address in this setting, or create a new one. To send reports to multiple addresses, separate them by comma.
Note
You should enter a DMARC policy after configuring the correct SPF and DKIM records for sending your mail and configuring your email signature to work with our service.
Example DMARC records:
dmarc.esputnik.com. IN TXT "v=DMARC1; p=reject; adkim=s; aspf=s; sp=reject; rua=mailto: postmaster@yourdomain.com
Example of a minimal DMARC entry (meaning “DMARC defined as disabled”):
dmarc.esputnik.com. IN TXT "v=DMARC1; p=none;"
Note
The correctness of the data entered into the DNS can be checked using a third-party service, for example, dnsquery.org.
BIMI Indicator
BIMI (Brand Indicators for Message Identification) is a sender identification mechanism that allows you to add a logo to emails.

Only senders with configured SPF, DKIM, and DMARC signatures with a strict policy (p=quarantine or p=reject) can implement BIMI. In addition, the logo display depends on the domain reputation, the volume and regularity of mailings, and the postal service. Learn more about setting up BIMI >
How Is the Reputation of the Sender Formed?
Several key aspects determine the sender’s reputation formation:
- Delivery: if a large part of the sender's emails end up in spam or do not reach the recipients’ mailboxes, this negatively affects the reputation.
- Spam complaints and unsubscribes: a large number of complaints or unsubscribes from recipients leads to a deterioration of the sender's reputation.
- Authentication: authentication technologies such as SPF, DKIM, DMARC and BIMI helps to confirm the sender’s authenticity and protect emails from forgery.
- Interaction with subscribers: postal services consider opening, clicks and duration of reading emails when determining reputation.
- Content: it is crucial to avoid using spam words and not to send emails containing only images.
How Does Domain Warming Work?
Usually, when creating a new mail domain, the company has a limited email list and sends campaigns infrequently, 1-2 mailings per day.
Under normal conditions, the volume of mailings grows steadily.
In the case of spam, on the contrary, a large email number is sent at once, after which the mailing stops. Reputational spam filtering mechanisms respond to this difference.
Therefore, you should gradually increase the number of emails sent from your domain, ensuring that the growth occurs evenly across all IP addresses of your mail server. The speed of sending messages should also gradually increase. The mailings should go out without long breaks — at least one daily campaign.
Warming up the domain —
a gradual increase in the number of emails sent. The better the domain is warmed up, the faster and more significant the number of contacts you can send a campaign.
If you send large mailings without warming up, you will receive errors from contacts located on the servers of large mail providers: You are sending too quickly, Too many messages from your server, etc. The reputation of your domain and the mail server that sent the mail may also deteriorate. Then, large mailers can reject even regular emails and campaigns.
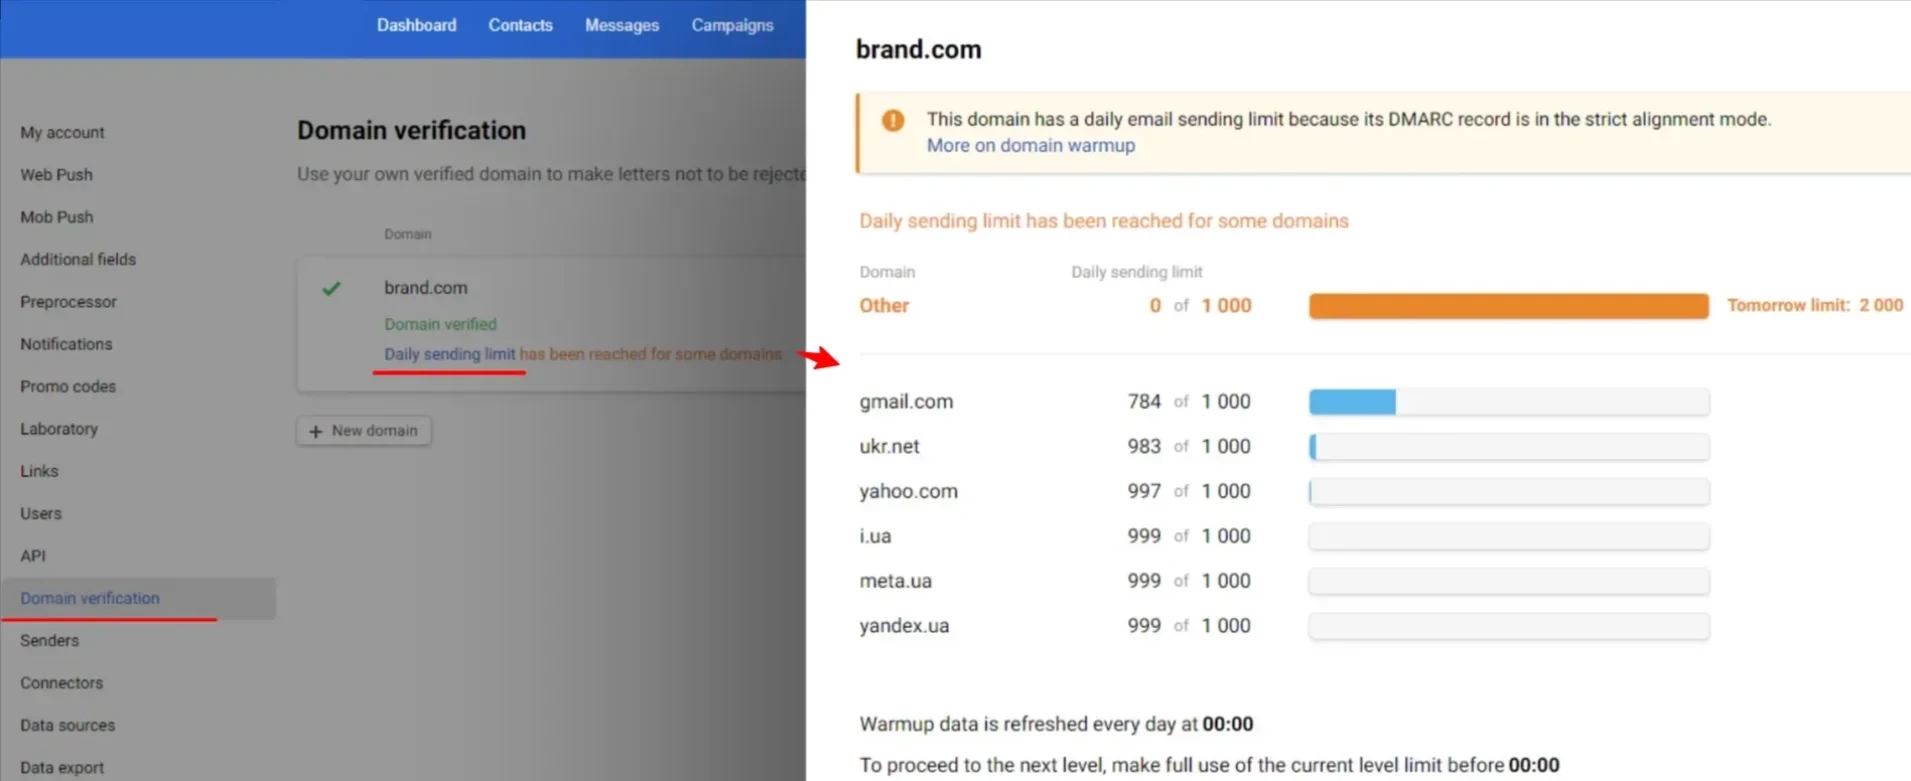
We care about the reputation and warming up of your email domain by limiting the sending speed and the number of emails sent daily with your domain's DKIM signature.
It looks like this in practice
- The domain is on the conditional first day of warming up.
- We need to send a campaign to 100,000 contacts. But the limit for the first day of warming up is at most 1000 emails per day. We send your campaign to the first 1000 contacts, signing the emails with your DKIM signature and limiting the sending speed, and the remaining 99,000 emails with our domain signature and regular speed (unless a strict DMARC policy is configured).
- The second-day limit is 2000 emails. And so on.
Note
To see the daily limit of mailings from your domain to various mail services, go to account settings → Domain verification → Daily sending limit (Follow the link >).
How Do I Check if Mail Is Working on My Domain?

For example, you created a domain example.org and placed its mail with your hosting provider (it is unnecessary to carry out all these actions in one company; you can buy a domain from one company, place DNS in another, and the mail service — in a third).
Now check how mail works.
First, send an email from a mailbox in your domain to your mailbox in some other long-running domain. For example, from info@example.org to lyst2@gmail.com. Then, in the opposite direction, from the address lyst2@gmail.com to the address info@example.org.
If you received both emails, everything is configured correctly. If not, there is a problem with the settings, and you need to contact your hosting provider's support team for help.
What Information about the Sender Does the Email Contain?
Email header fields contain much technical information not normally shown to the recipient. Typically, the recipient sees only two parameters:
- who the email came from (From: or Sender: fields of the email header)
- with what subject (Subject field: email header).
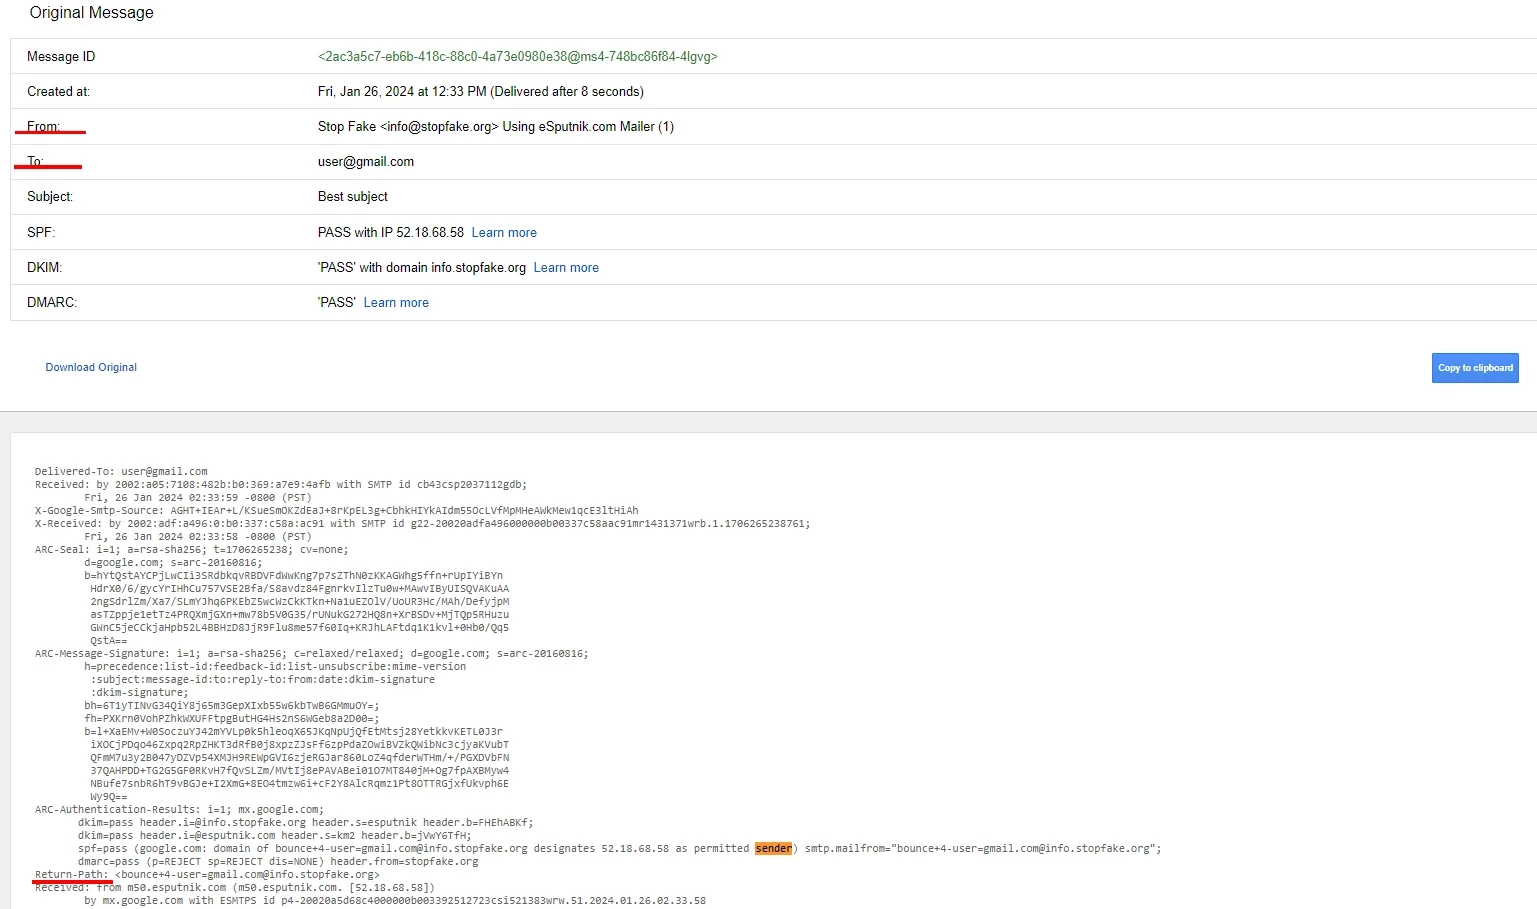
To see the rest of the email header fields, you need to find a button or menu item in your email client that shows all the email headers or the entire message along with the headers. For example, in Gmail, you need to select Show original from the drop-down list in the open email menu:

Basic Fields Used in the Email Header
- From: — the field contains the sender's address, i.e., your address (the Sender value from the email editor);
- Sender: — technical email sender (here we put the technical address in our domain with the basic connection option to improve deliverability to mail servers running on Microsoft software);
- Reply-to: — the address to which the response will be sent if the recipient of this email clicks the Reply button (the field is filled in only if you specify the reply address in the email editor);
- To: — the address of the email recipient (the address of the recipient from your contact list is entered here when sending the email);
- Subject: — email subject (the Subject value from the email editor);
- Date: — date and time of email creation (entered by our system at the time the email is generated and sent to the recipient);
- Message-ID: — unique email identifier in our system;
- X-Mailer: — the name of the specialized software of our service that sends email and the number of the server block through which the sending was made;
- Feedback-ID: — mailing identifier for tracking in Google Postmaster;
- List-Id: — mailing identifier for filtering on the user side;
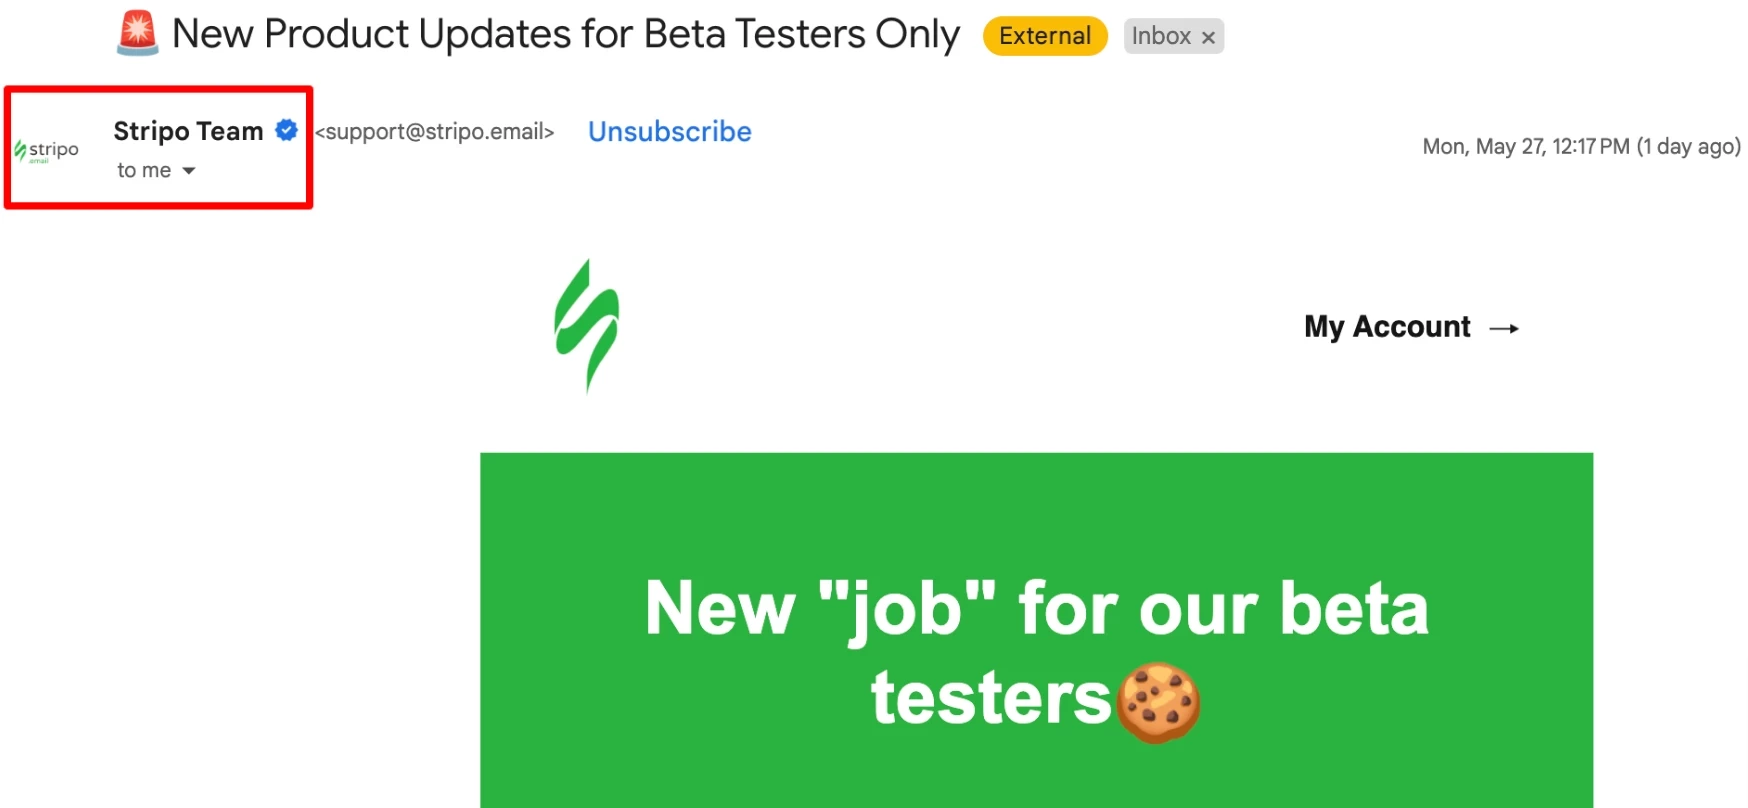
- List-Unsubscribe: — links for automatically unsubscribing a recipient (thanks to this field, the Unsubscribe button appears in the email menu in the interfaces of many large email providers);
- DKIM-Signature: — digital electronic signature of the sending server (1 or 2, created by our server at the time the email is sent to the recipient’s mail server; in addition to the signature itself, it contains the key identifier, domain name, and a list of signed email fields);
- Return-Path: — technical address of the sender (here we put the technical address of the sender in our or your domain, depending on the connection option, which we will use to catch delivery errors and spam complaints);
- Received: — information about the server from which the email was received (the string is added by each mail server and service through which the email passes to the recipient's mailbox);
- Authentication-Results: — the receiving mail server can add a string to record the results of DKIM/SPF/DMARC checks.
Email clients can render email header information differently to make it easier for the recipient to read.
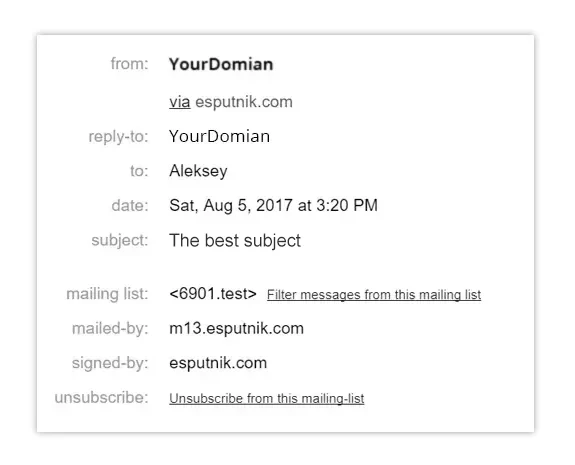
For example, you can see additional information under the sender's name in Gmail — mailed-by: and signed-by:, which is extracted from the Return-Path: and DKIM-Signature fields.

Most mail services do not visualize the Sender: field. The exception is email services and Microsoft products, where the Sender: field has higher priority and, if present, is shown as Sender instead of the value from the From: field.
What Will My Subscribers See Depending on the Option of Connecting My Domain to Your Service?
For example, you have a domain called stopfake.org. You want to send emails on behalf of the info mailbox in this domain. Then, the title will be
From:info@example.org
Email is formed like this under normal (standard) conditions:
- field From: — your address
info@stopfake.org, - field To: — recipient’s address,
- Sender: and Return-Path: fields — our technical address, which catches delivery errors and is used to process some spam complaints.

DKIM of our domain signs an email.
Header template:
Mail From (envelope):bounce+XXX@m11.esputnik.com
From: name@yourdomain.com
Sender: bounce+XXX@m11.esputnik.com
Return-Path:bounce+XXX@m11.esputnik.com
where XXX is the email recipient's address, VERP-encoded to increase the chances of our service to identify the recipient of the email when analyzing email notifications about delivery errors and spam complaints.
This is the basic option. It connects to everyone by default.
The following information will be visible in Gmail:
mailed-by: esputnik.com,
signed-by: esputnik.com.
We recommend that when working with our service using the basic connection option, add our insert to the SPF string of your domain include:spf2.esputnik.com.
For example, like this:
stopfake.org. IN TXT "v=spf1 +a +mx include:spf2.esputnik.com -all"
When you set up your email signature, emails will begin to be signed with your domain key.
How Does Gmail Support Digital Signatures?
To reduce spam complaints and thereby preserve the reputation of the sender, a link to unsubscribe is added:
- in the email header:

- in the general messages list in Gmail:

In addition, senders with configured digital signatures have the ability to send interactive mailings using AMP technology.

Updated 11 days ago
